Tool Settings
NOA Debugger provides a method to change the tool settings.
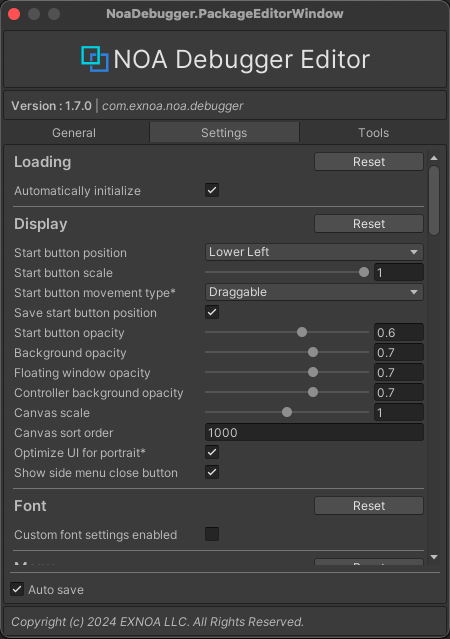
Tool setting changes are made using the NOA Debugger Editor. The NOA Debugger Editor can be launched by selecting Window -> NOA Debugger in the Unity menu.
Various settings can be changed in the [Settings] tab in EditorWindow. For how to save settings, please refer to Save NOA Debugger Settings described later.
Common Functions
[Reset] Button
In some functions, you can reset the settings to the default values specified by NOA Debugger by pressing the [Reset] button.
Setting Whether to Automatically Initialize the Tool
You can set whether to automatically initialize the tool.

By operating the checkbox, you can change whether to initialize automatically.
Note: If the box is unchecked, the initialization will not be performed.
If you do not automatically initialize, please initialize using the API.
Please refer to this document for the API.
Changing the Display Settings of NOA Debugger
You can change the settings related to the display of NOA Debugger.

| Item | Description |
|---|---|
| Start button position | Specifies the position of the NOA Debugger start button. Options include: Upper Right, Upper Left, Upper Center, Middle Right, Middle Left, Lower Right, Lower Left, Lower Center. |
| Start button scale | Specifies the scale of the NOA Debugger start button in the range of 0.5 to 1. |
| Start button movement type | Specifies whether the NOA Debugger start button is draggable or fixed. Options include: Draggable, Fixed. |
| Save start button position | Specifies whether to remember the position of the NOA Debugger start button when it is moved by dragging. If enabled, the button's position will be retained on the next startup. |
| Start button opacity | Specifies the opacity of the NOA Debugger start button in the range of 0 to 1. |
| Background opacity | Specifies the opacity of the NOA Debugger background in the range of 0.1 to 1. |
| Floating window opacity | Specifies the opacity of the floating window in the range of 0.1 to 1. The recommended value is 0.2 to 0.7. |
| Controller background opacity | Specifies the opacity of the controller background in the range of 0.1 to 1. |
| Canvas scale | Specifies the NOA Debugger Canvas scale in the range of 0.8 to 1.2. |
| Canvas sort order | Specifies the SortOrder of the NOA Debugger Canvas. Note: Scale settings are disabled while the tool is displayed in world space. Instead, use the RootTransform in the NoaDebug. |
| Optimize UI for portrait | Optimizes the display order of the NOA Debugger's UI elements for mobile devices when displayed in portrait orientation. If this setting is enabled, some UI elements are arranged in reverse order from the bottom to the top of the screen, allowing for easier access from the bottom of the screen. |
| Show side menu close button | Specifies whether to display a close button for the NOA Debugger in the side menu. |
Changing the Font Asset in Use
You can set the font asset to be used by the tool.
| Item | Description |
|---|---|
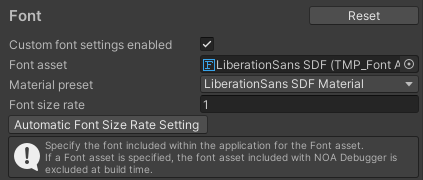
| Custom font settings enabled | Specify whether to change the font asset to be used. Other font settings will be displayed only when this flag is on. |
| Font asset | Specify the font asset to be used by the tool. Note: Specify the font included within the application. |
| Material preset | Specify the material to be used. |
| Font size rate | Specify the font size multiplier. When the font asset is changed, it automatically calculates and sets the appropriate value. |
| Automatic Font Size Rate Setting | Automatically calculates and sets the font size multiplier. |
If a "Font asset" is specified, the font asset included with NOA Debugger is excluded at build time.
If the character size changes due to the font asset and the layout is disrupted, please adjust the value of "Font size rate".
If you want to use a font that is not included within the application, you can apply the font at runtime.
For how to apply fonts at runtime, refer to the SetFont in the APIs.
Changing the Display Order and Visibility of the Menu
You can set the order and display of the menu to be shown after the tool is launched.
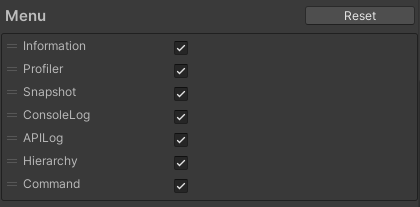
By manipulating the drag handle on the left of the menu element, you can change the display order of the menu.
Note: Elements are displayed in the order from the top. The first element is the menu to display first when the tool is launched.
By operating the checkbox on the menu element, you can change the display/hide of the menu.
Note: If it is not checked, it is hidden.
Adding/Removing/Configuring Custom Menus
For more details on the custom menu, please refer to Adding Custom Menus.
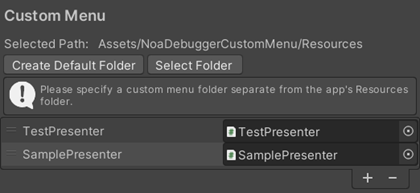
Custom menus are added using the following steps:
- Press the [+] button to add a list.
- In the Script field, set the class you created by inheriting
NoaCustomMenuBase.
By manipulating the drag handle on the left of the menu element, you can change the display order of the menu.
Note: Elements are displayed in the order from the top. The first element is the menu to display first when displaying the custom menu.
To remove the added menu, you can follow these steps:
- Select the menu you want to delete.
- Confirm that the selected list is highlighted, and press the [-] button.
To configure the destination folder for the prefab of the screen displayed in the custom menu, follow these steps:
To set the default placement location:
- Press the [Create Default Folder] button to create a folder in Assets/NoaDebuggerCustomMenu/Resources.
To set a custom placement location:
- Press the [Select Folder] button to display the folder selection dialog.
- Select any folder under Assets.
Note: The destination folder will be excluded from compilation when the package is excluded, so please specify a folder separate from the Resources folder used in your application.
Changing the Information Value Save Settings
You can change the save settings for values in Information.
By enabling the checkbox, values will be saved and reflected on the next startup.

Changing the Number of Logs Retained
You can change the number of logs to keep by dragging the slider left or right or by directly entering a number in the input field.

| Item | Description |
|---|---|
| Console log count | Specify the number of logs to be retained in ConsoleLog in the range of 99 to 999. Note: The logs to be retained are for each log type. |
| API log count | Specify the number of logs to be retained in APILog in the range of 99 to 999. Note: The logs to be retained are for each log type. |
Changing the Number of Display Levels of Object Details in Hierarchy
You can change the number of display levels of Object details by dragging the slider left or right or by directly entering a number in the input field.

| Item | Description |
|---|---|
| Hierarchy levels | Specify the number of levels to display in the range of 1 to 10. Please note that the deeper the levels, the more processing load will occur during the search. |
Setting the Display Format of Debug Command
You can change the display format of debug command for each screen orientation.

| Item | Description |
|---|---|
| Landscape format | Specify the display format for landscape orientation. |
| Portrait format | Specify the display format for portrait orientation. |
| Format | Description |
|---|---|
| Panel | This is a format that displays commands based on screen width and the length of values and names used in commands. |
| List | This is a format that displays commands vertically. |
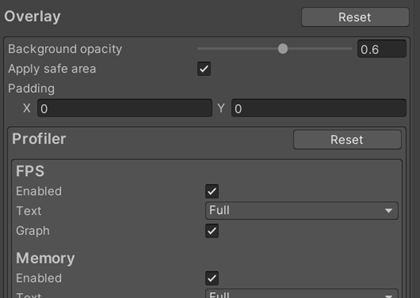
Changing the Overlay Display Settings
You can change the settings related to the overlay display.
For more about overlays, refer to About the Overlays.
Common Settings
These settings apply to all overlays.
| Item | Description |
|---|---|
| Background opacity | Specifies the opacity of the overlay background in the range of 0.1 to 1. |
| Apply safe area | Turning on this option adjusts overlays to fit within the safe area. |
| Padding | Sets the padding when positioning overlays. |
Individual Settings
Profiler
FPS
| Item | Description |
|---|---|
| Enabled | Specifies whether to display the FPS. |
| Text | Specifies the amount of information to display in the FPS text using Simple or Full. |
| Graph | Specifies whether to display the FPS graph. |
Memory
| Item | Description |
|---|---|
| Enabled | Specifies whether to display the Memory. |
| Text | Specifies the amount of information to display in the Memory text using Simple or Full. |
| Graph | Specifies whether to display the Memory graph. |
Rendering
| Item | Description |
|---|---|
| Enabled | Specifies whether to display the Rendering. |
| Text | Specifies the amount of information to display in the Rendering text using Simple or Full. |
| Graph | Specifies whether to display the Rendering graph. |
Other
| Item | Description |
|---|---|
| Position | Specifies the position of the profiler overlay. Note: This cannot be specified for each item such as FPS. |
| Scale | Specifies the scale of the profiler overlay in the range of 0.5 to 1.5. |
| Axis | Specifies the direction when arranging multiple profiler overlays such as FPS and Rendering. |
ConsoleLog
| Item | Description |
|---|---|
| Position | Specifies the position of the console-log overlay. |
| Font scale | Specifies the font scale for console-log overlay logs within a range of 0.5 to 1.5. |
| Maximum log count | Specifies the maximum number of log displayed in the console-log overlay, within a range of 10 to 30. |
| Minimum opacity | Specifies the minimum opacity of the console-log overlay in the range from 0.0 to 1.0. |
| Active duration | Specifies the active duration of the console-log overlay within a range of 1 to 5 seconds. The overlay will be fade out automatically after the specified number of seconds have elapsed since the last log output. |
| Show timestamp | Specifies whether to display timestamps in the overlay logs. |
| Show message logs | Specifies whether to display message logs on the console-log overlay. |
| Show warning logs | Specifies whether to display warning logs on the console-log overlay. |
| Show error logs | Specifies whether to display error logs on the console-log overlay. |
APILog
| Item | Description |
|---|---|
| Position | Specifies the position of the api-log overlay. |
| Font scale | Specifies the font scale for api-log overlay logs within a range of 0.5 to 1.5. |
| Maximum log count | Specifies the maximum number of log displayed in the api-log overlay, within a range of 10 to 30. |
| Minimum opacity | Specifies the minimum opacity of the api-log overlay in the range from 0.0 to 1.0. |
| Active duration | Specifies the active duration of the api-log overlay within a range of 1 to 5 seconds. The overlay will be fade out automatically after the specified number of seconds have elapsed since the last log output. |
| Show timestamp | Specifies whether to display timestamps in the overlay logs. |
| Show message logs | Specifies whether to display message logs on the api-log overlay. |
| Show error logs | Specifies whether to display error logs on the api-log overlay. |
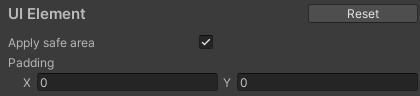
Changing the Display Settings of UI Elements
You can change the settings related to the display of UI elements.
For details about UI elements, refer to NoaUIElement.
| Item | Description |
|---|---|
| Apply safe area | Turning on this option adjusts UI elements to fit within the safe area. Note: This applies when positioning with AnchorType. |
| Padding | Sets the padding when positioning UI elements. Note: This applies when positioning with AnchorType. |
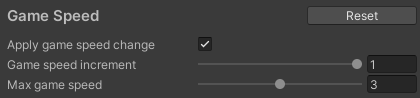
Set the Game Speed Change Behavior
You can set the game speed change behavior.
| Item | Description |
|---|---|
| Apply game speed change | Turning on this option allows you to change the game speed by NOA Debugger. NOA Debugger will change the game speed by changing the value of Time.timeScale. |
| Game speed increment | The amount the game speed changes each time you click the game speed change button. It can be set in the range of 0.1 to 1.0 in increments of 0.1, and the default is 1.0. |
| Max game speed | Specifies the maximum game speed that NOA Debugger can set. It can be set in the range of 1.0 to 5.0 in increments of 0.1, and the default is 3.0. |
Setting Shortcut Keys
You can execute some of the APIs provided by the tool using shortcut keys.
While default shortcut key settings are provided, you can customize them as needed.
Settings are managed by keycodes, so due to differences in keyboard layout settings, the same key may not be recognized correctly.
Note: Wireless keyboards connected in mobile environments are not supported.
Note: Separate settings are maintained for the Input System environment and the Input Manager environment.

| Item | Description |
|---|---|
| Enable all shortcuts | When this option is turned off, all keyboard shortcuts are disabled. The default setting is ON. |
| Shortcut commands | The list of shortcut commands. For more details on each command, please refer to the information below. |
Shortcut Command List
| Item | Execution Details | Default keyboard shortcut |
|---|---|---|
| ToggleDebugger | Opens the last menu displayed in the tool. Running it again closes the menu. | Alt + Shift + D |
| ToggleOverlay | Toggles the visibility of the overlay. | Alt + Shift + O |
| ToggleFloatingWindow | Toggles the visibility of the floating window. | Alt + Shift + F |
| ToggleTriggerButton | Toggles the visibility of the trigger button. | Alt + Shift + S |
| ToggleUIElements | Toggles the visibility of UIElements | Alt + Shift + E |
| ToggleAllUI | Toggles the visibility of all NOA Debugger UI elements. | Alt + Shift + X |
| ResetApplication (Hold) | Transitions to the application's initial scene. Only works with a long press. | Alt + Shift + R |
| CaptureScreenshot | Takes a screenshot. | Alt + Shift + C |
| TogglePauseResume | Toggles between game pause and resume. | Shift + Space |
| DecreaseGameSpeed | Decreases the game speed. Long-pressing sets the speed to its minimum value. | Alt + Shift + J |
| IncreaseGameSpeed | Increases the game speed. Long-pressing sets the speed to its maximum value. | Alt + Shift + K |
| FrameStepping | Pause the game and stepping frame by frame. While holding down, it will continue to stepping frames at regular intervals. | Alt + Shift + M |
| ResetGameSpeed (Hold) | Resets the game speed to its default value. Only works with a long press. | Alt + Shift + L |
| CustomAction1-5 | Executes the actions registered to the controller's F1-F5 buttons. If a long-press action is set, it will be executed when long-pressed. | Alt + Shift + 1-5 |
List of Configurable Modifier Keys
This is the list of available modifier keys.
Modifier keys configured on other operating systems will be replaced with the corresponding keys.
Shortcuts that press multiple modifier keys simultaneously can also be set.
| Windows | Mac |
|---|---|
| Ctrl | Command |
| Alt | Option |
| Shift | Shift |
Note: The control key on macOS is not supported for shortcut registration.
Other Settings
You can change some other settings of NOA Debugger.

| Item | Description |
|---|---|
| Auto create EventSystem | Specify whether to automatically create an EventSystem if it does not exist at runtime. Turning off this option will not automatically create an EventSystem. If EventSystem does not exist, NOA Debugger's UI will not work. |
| Error notification | You can select the error notification display format from the following options: - Full: The start button blinks and then stays lit in case of an error. This is the default setting. - Flashing: The start button only blinks in case of an error, it does not stay lit. - None: Error notifications are disabled, and the start button neither blinks nor stays lit. |
Saving NOA Debugger Settings
You can configure whether to automatically save various settings of the NOA Debugger.

| Element Name | Display Information |
|---|---|
| Auto save | Specifies whether to automatically save settings when they are changed. By default, this is enabled, so settings are automatically saved when changed. |
| Save | Displays the [Save] button when settings are changed and Auto save is off. Clicking the [Save] button will save the settings. |