Launching Tool

The tool starts when you press [ ] button.
This start button is located at the bottom left of the screen when the application starts, and you can adjust its position by dragging.
The position of the start button is saved separately in portrait and landscape screens, and if the saved value is off the screen, it is relocated to the bottom left.
Note: If the SortOrder is set to 1000 or more in a Canvas within the application, the UI of NOA Debugger may not come to the front. If you want to change the SortOrder of the Canvas, please refer to the Tool Settings and set the Canvas sort order.
Controller
By long pressing the [] button, a controller appears that allows you to perform various operations.
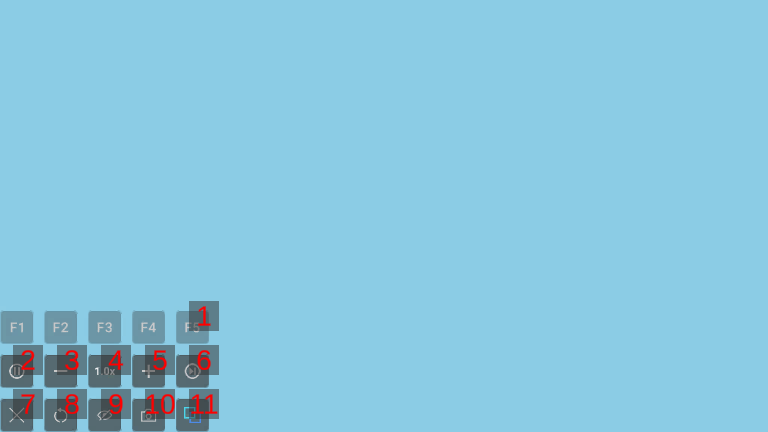
1. User Defined Action (F1-F5)
When a button is pressed or long pressed, a user defined action is executed.
- User defined actions are registered through API.
- You can define actions for each button: press, long press, and toggle.
- When using the press and long press actions, the toggle action cannot be used.
- Conversely, when using the toggle action, the press and long press actions cannot be used.
- You can set whether to use press and long press or toggle using the API.
2. Pause/Resume Button
Pressing the [ ] button while playing will pause the game, and pressing the [
 ] button while paused will resume the game.
3. Slower Game Speed Button
Press the [-] button to slow down the game speed.
- The minimum value is 0.1.
- By long pressing the button, you can set minimum value.
4. Game Speed
Displays the current game speed setting. NOA Debugger will change the game speed by applying current setting to Time.timeScale. By long pressing the button, you can set default value (1.0).
5. Faster Game Speed Button
Press the [+] button to speed up the game.
- The maximum value is set using the method described in Configuring the Controller Behavior section within the Tool Settings.
- By long pressing the button, you can set maximum value.
6. Frame Stepping Button
Pressing the [ ] button pauses the game and advances it by one frame.
While holding the button, frame advancement is executed at regular intervals.
7. Close Button
Pressing the [×] button will close the controller.
8. Application Reset Button
Transitions to the application initial scene by long-pressing the [ ] button.
You can set a callback that is fired before the transition is executed. For more details, see NoaDebug.OnApplicationReset.
9. Hiding All UIs Button
Pressing the [ ] button hides the NOA Debugger-related UI.
Press the location of the start button to show it again.
10. Screenshot Button
Pressing the [ ] button will capture a screenshot.
- You can control whether or not to include NOA Debugger-related UI in the screenshot by registering a callback for screenshot capturing.
- If Override is checked in the screenshot settings dialog, the capture targets selected in ScreenshotTarget are applied.
- If Override is not checked in the screenshot settings dialog, the capture targets set in the callback are applied.
- You can get the screenshot image data by calling a specific API.
- See NoaController for API details.
Long pressing the button opens the screenshot settings dialog.
11. Tool Launch Button
Pressing the [] launches the tool.
Screenshot Settings Dialog
Long pressing the [] button on the controller displays a settings dialog to select the screenshot capture targets.
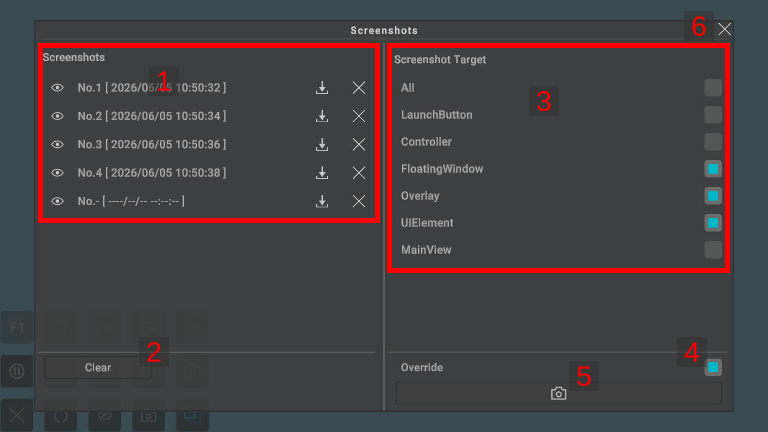
1. Screenshots
Displays the saved screenshots in oldest-to-newest order. You can view information and perform operations on each screenshot.
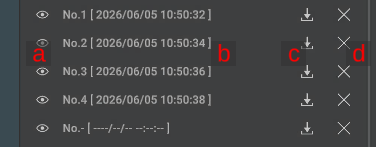
| Element | Description |
|---|---|
| a. Preview button | Pressing the [ ] button displays a dialog where you can view the screenshot image. ] button displays a dialog where you can view the screenshot image. |
| b. Capture time | Displays the time when the screenshot was taken. |
| c. Download button | Pressing the [ ] button saves the screenshot as a PNG file on the device. For output locations, see About Download. The button cannot be pressed in unsupported environments. ] button saves the screenshot as a PNG file on the device. For output locations, see About Download. The button cannot be pressed in unsupported environments. |
| d. Clear button | Pressing the [×] button clears the screenshot. |
2. Clear Button
Pressing the [Clear] button clears all saved screenshots.
3. ScreenshotTarget
Configure which UI elements to include in the capture.
The selected capture targets persist when you restart the app.
For details on each item, please refer to NoaController.ScreenshotTarget in NoaScreenshotCallbacks.
4. Override
Configure whether the capture targets selected in ScreenshotTarget apply when you take screenshots outside this dialog.
5. Screenshot Button
Pressing the [] button captures a screenshot. The capture includes the targets selected in ScreenshotTarget.
6. Close Button
Pressing the [×] button closes the settings dialog.
Operation When an Error Occurs in the Application
When a Unity error or API error occurs, the launch button of the tool blinks red for a few seconds to alert you. After that, it continues to light up in red until it displays the function that detected the error.
If you had hidden the launch button of the tool, the launch button will be hidden after blinking red for a few seconds.
The notification settings for error output can be changed from the NOA Debugger Editor. Please refer to the Tool Settings for more details.
Operation When Not Meeting the System Requirements
If you do not meet the system requirements, the text of NOA Debugger in the top left of the window turns orange.